A lesson feels purposeful not just because of its content, but because of how it's organized. Two tutors might cover the same grammar or vocabulary, but their students can have very different experiences based on the lesson's structure.
Structure doesn't mean being inflexible. A good online lesson isn't about following a strict script. Instead, it gives the lesson a clear shape the student can feel: a beginning to start, a middle to build on, and an end to wrap up. This helps the hour feel connected, not just a list of activities.
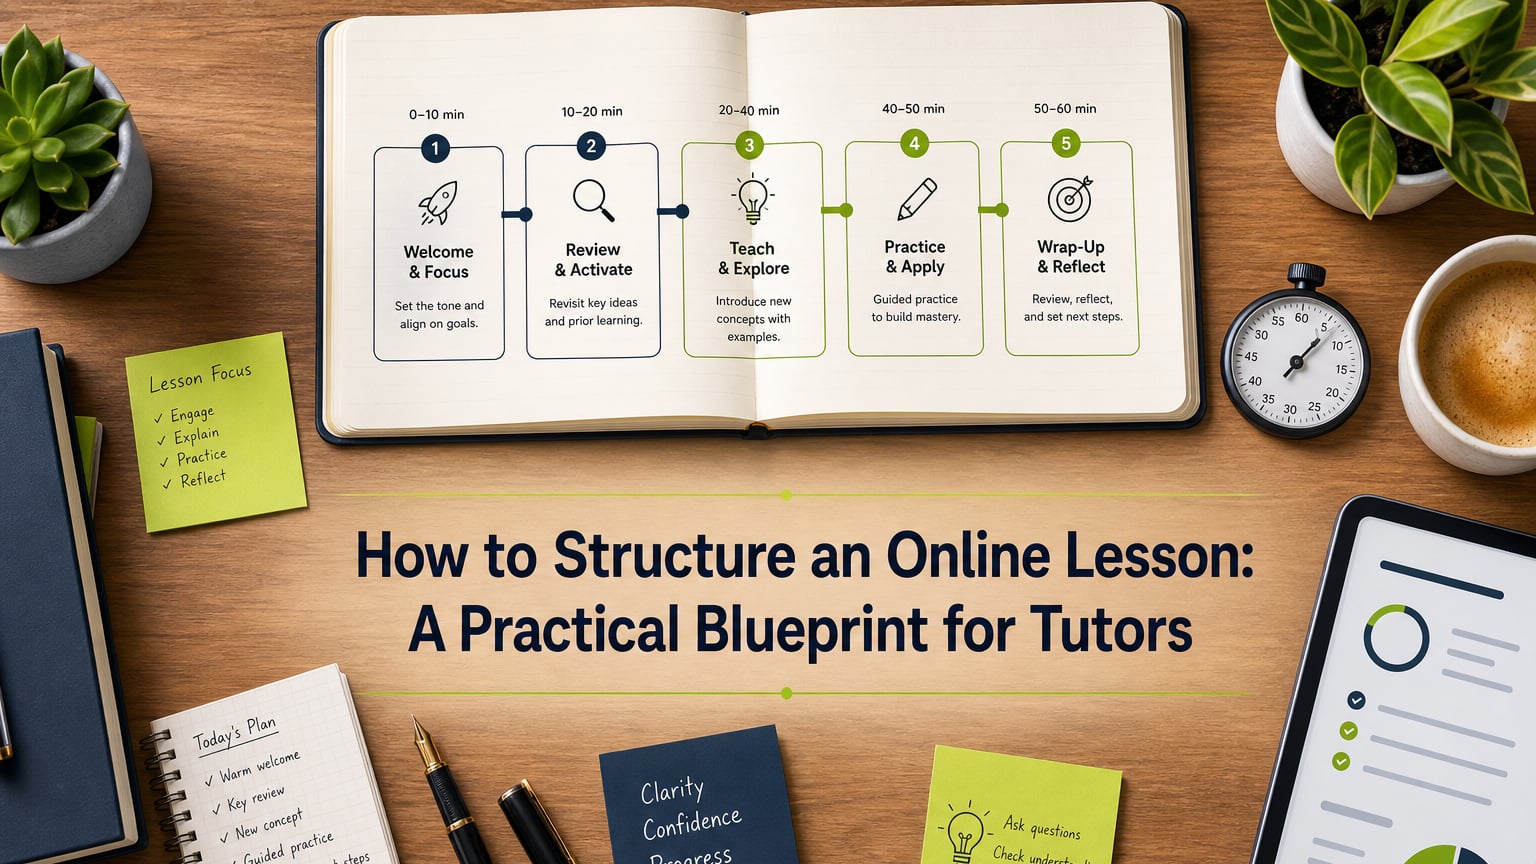
This guide gives you a clear structure for a 60-minute online lesson. It shows how much time to spend on each part, what each stage should do, and how to adjust for shorter or longer lessons. For ideas on making lessons more engaging, see the sections on keeping ESL students interested and making online classes interactive.
Why Online Lessons Need Stronger Structure Than In-Person Ones
Online lessons are more likely to lose structure than in-person sessions, for two main reasons.
The first reason is attention. Without the physical cues of a shared space, like a student's posture or the energy in the room, it's harder to keep students focused online. Their attention fades faster and takes longer to recover. Lessons without clear transitions don't give students a chance to reset, but lessons with planned stage changes give their brains a fresh start each time.
The second reason is the lack of natural rhythm. In person, moving between activities often means turning a page, moving around, or picking up a pen. Online, everything looks the same—just two faces on a screen and a shared document. Without clear markers, activities blend together and the lesson loses its shape.
Adding clear structure to each session isn't about making lessons feel robotic. It's about giving students something steady to focus on.
The 5-Stage Framework for a 60-Minute Online Lesson
Stage 1 — Opening and Activation (0–8 minutes)
Purpose: Connect, orient, activate.
The first minutes of an online lesson are doing three jobs simultaneously: establishing the social connection between tutor and student, activating the student's English (or maths, or whatever subject) brain before the main work begins, and setting a visible goal for the session.
What to do:
- Brief personal check-in — one or two questions, genuinely listened to (not a formality before the "real" lesson begins)
- Write the session goal explicitly on the board: "Today: you'll use reported speech in three original sentences without prompting"
- Run a short activation task — a warm-up question, a quick vocabulary recall, or one of the quick games that gets the student producing language immediately.
What to avoid: spending more than two minutes on admin, rescheduling, or anything that delays the student's first active moment in the lesson. The faster the student does something, the more engaged they are.
Timing tip: eight minutes is the maximum, not the goal. If you've worked with a student for a while, you can often shorten the opening to four minutes and still cover everything you need.
Stage 2 — Input and Presentation (8–20 minutes)
Purpose: Introduce or revisit the session's main content.
Tutors often spend too much time on this stage. Explanations can take over, and students end up just listening instead of participating. Keep this part focused and stick to the time limit.
What to do:
- Present the new concept, text, or skill with the minimum necessary explanation — enough to be clear, not enough to be exhaustive.
- Use the board actively: write key language, annotate examples, build a visual reference the student can use in the practice stage.
- Check understanding before moving to practice — not with "does that make sense?" (which almost always gets a yes) but with a short, specific task: "Before I explain any more, can you give me your own example?"
What to avoid: explaining for more than eight minutes in a row without involving the student. After eight minutes of nonstop input, students absorb less. Break up explanations with student tasks every five to seven minutes, even during the teaching phase.
The interactive whiteboard is your main tool here. Use it to annotate examples in real time and have the student underline or circle items instead of just watching. Build the concept visually, not just with words. If you load materials onto the board before class, you can start right away without wasting time on setup.
Stage 3 — Guided Practice (20–38 minutes)
Purpose: The student applies the concept with support available.
This is the most important part of the lesson, but it's often cut short to allow for more explanation. Real learning happens during guided practice, not during the input phase, but when students get to try things with your support.
What to do:
- Set a specific task directly connected to the session goal.
- Have the student work on the board — writing, annotating, completing, building — while you observe and guide.
- Intervene minimally: let the student attempt the task, note errors, and return to correct or query rather than hovering and correcting in real time.
- Use the tracking tool to see exactly where the student's focus is on the board without disrupting them.
What to avoid: doing the task for the student by explaining too much during the practice phase, or converting guided practice back into explanation when the student makes an error.
Aim for the student to spend about 70% of this stage producing and 30% getting feedback. If those numbers are flipped, it means you're still in input mode, not real practice.
Stage 4 — Freer Practice or Production (38–52 minutes)
Purpose: The student uses the concept more independently, in a less constrained context.
If Stage 3 is guided practice, which is structured and close to the target form, Stage 4 lets the student move away from that support. Here, they use the same language or skill in a more open, real-world context.
What to do:
- Speaking: a short discussion, roleplay, or opinion task that requires the session's target language
- Writing: a short paragraph or email in their own words
- Problem-solving: apply the skill to an unfamiliar problem
- For ESL specifically: interactive activities such as 60-Second Expert, Role Play with a Twist, or Live Collaborative Writing work particularly well here
What to avoid: making the freer practice task too long or complicated. If it's too much, students stop using the target structure and go back to old habits. A focused ten-minute task is better than a long, open-ended one.
This stage is also where you learn the most from student errors. Since they're working without support, their mistakes show real gaps in understanding, not just confusion with the scaffold. Make a note of these in the student's profile for next time.
Stage 5 — Review, Close, and Forward Link (52–60 minutes)
Purpose: Consolidate, celebrate, commit to the next step.
Many tutors rush or skip this stage, but from a student-retention point of view, these eight minutes are some of the most important of the lesson.
What to do:
- Ask the student to summarise: "What are the three things you worked on today?" — let them generate the summary, not you.
- Name the specific progress made: "You used reported speech correctly four times today. You needed a prompt for it last week. That's a real shift."
- Assign specific, connected homework: "Write three sentences using today's structure and send them to me before Thursday. We'll use them as the starting point next session."
- Tell the student what comes next: "Next lesson we're going to use this structure in a speaking task — something slightly harder than today."
This five-minute close helps students see their progress and keeps them motivated to come back. When students finish a lesson knowing what they achieved, what they're working on, and what's next, they feel more connected to the next session than if they just say goodbye.
The 60-Minute Framework at a Glance
| Stage | Time | Student role | Primary tool |
|---|---|---|---|
| 1. Opening + activation | 0–8 min | Speaking, first production | Board: goal + warm-up |
| 2. Input + presentation | 8–20 min | Listening + co-annotating | Board: examples, visuals |
| 3. Guided practice | 20–38 min | Writing + building on board | Board: student writes |
| 4. Freer practice | 38–52 min | Speaking or writing, independently | Board or conversation |
| 5. Review + close | 52–60 min | Summarising, reviewing | Board: goal check-off |
Adapting the Framework for Different Session Lengths
For a 45-minute session: shorten Stage 2 to 8 minutes, combine Stages 3 and 4 into one 20-minute practice block, and keep Stage 5 at 7 minutes. Never cut the closing stage.
For a 30-minute session: Opening (3 minutes), one focused practice task (20 minutes), and close (7 minutes). With only 30 minutes, keep input short—the session should be mostly practice and review.
For a 90-minute session: add a second round of Stages 2–4 with a new sub-skill or topic that connects to the first. Take a real two-minute break at the 45-minute mark.
The Setup That Makes Structure Easy to Maintain
A lesson structure is only as strong as the environment you use. If you have to switch tools for every stage—like opening a video call, finding the whiteboard, or switching to the homework app—these transitions can make the lesson feel disjointed instead of organized.
An integrated virtual classroom—with the board, video, student profile, and homework all in one place—makes transitions between stages smooth and intentional. The session's goal stays visible on the board, you can see last week's progress notes before class, and homework from Stage 5 is logged automatically.
Give this structure a try in your next lesson. It's free, and you won't need a credit card.
Frequently Asked Questions
What is a good structure for an online lesson?
A reliable five-stage structure covers: opening and activation (connect + set goal), input and presentation (introduce content with built-in check tasks), guided practice (student produces on the board with support), freer practice (more independent production), and review and close (student summarises, progress is named, next session is previewed). The single most important principle is that the student should be actively producing something in four of the five stages — not just receiving.
How long should each part of a 60-minute online lesson be?
Opening: 5–8 minutes. Input: 10–12 minutes. Guided practice: 15–18 minutes. Freer practice: 12–15 minutes. Review and close: 7–8 minutes. The most common structural mistake is over-weighting the input stage at the expense of practice — most tutors explain for too long and practice for too briefly.
How do you plan a 60-minute online tutoring session?
Start from the session goal — one specific, observable thing the student will be able to do by the end that they couldn't do as reliably at the start. Build backwards: what practice will produce that outcome? What input does the student need to make that practice possible? What warm-up will activate the relevant existing knowledge? The goal drives the plan, not the other way around.
What should be included in an online lesson plan?
A session goal (specific and observable), a warm-up task, the main input or content with at least one student check-task built in, a guided practice activity where the student writes or produces on a shared board, a freer practice task, and a close that names progress and previews the next session. Homework should be directly connected to the session goal and structured to feed into the next lesson.
How do you start and end an online lesson effectively?
Start with a brief, genuine check-in, then immediately write the session goal on the shared board and run a one- to two-minute activation task that requires the student to produce language before any explanation begins. End by asking the student to summarise what they covered, naming one specific measurable achievement, and telling them exactly what comes next session. The close is as important as the opening — it's what students remember and what drives their motivation to return.